
Limewashed brick has rapidly gained popularity among homeowners, interior designers, and DIY enthusiasts alike, thanks to its vintage appeal and sustainable benefits.
If you’ve admired the timeless, rustic charm of brick walls in old European farmhouses or Tuscan villas adorned with a soft, muted finish, chances are you’ve encountered limewash.
From enhancing the aesthetic of your home’s facade to adding warmth and texture to interior walls, limewashing offers endless design possibilities. Limewash can accentuate or alter the original brick color, creating various aesthetic outcomes for homeowners looking to modernize or unify their home’s appearance. But what exactly is limewash? How is it different from paint or whitewash? And, more importantly, how can you apply it to your project? This blog answers all your questions and equips you with everything you need to know to start your limewash transformation.
What Is Limewashed Brick?
Limewash is a centuries-old technique that involves using a mixture of slaked lime (calcium hydroxide) and water to create a natural paint-like solution. When applied to brick, limewash creates a soft, chalky finish that allows the brick’s texture to shine through while offering a breathable layer of protection.
A limewash paint finish is highly versatile, with various applications ranging from restorative construction to modern interior design. It can be used to achieve different effects, including the more complex ‘hot limewash’ technique.
Unlike modern paints, which sit on the surface, limewash penetrates the porous materials, forming a chemical bond that lasts for decades. This makes it particularly well-suited for brick and other masonry surfaces.
According to Michael Warner, an architectural preservation specialist, “When it comes to maintaining the character of brick surfaces, limewash is a top choice for homeowners who want a timeless, earthy look.”
Pro Tip: For interiors, combine limewashed brick with warm lighting to amplify the soft texture.
What is Limewash?
Limewash is a type of natural, breathable paint made from crushed limestone and water. It has been used for centuries to add a decorative and protective finish to porous surfaces like brick, stone, and stucco. Limewash is a popular choice for homeowners who want to maintain the natural look and feel of their brick house while also protecting it from the elements. Unlike traditional latex-based paints, limewash is a mineral-based paint that allows the brick to breathe and retain its original texture.
One of the key benefits of limewash is its ability to penetrate the brick surface, creating a long-lasting bond that won’t peel or chip over time. This makes it an excellent option for those looking to enhance the aesthetic appeal of their brick house while ensuring its durability. Additionally, limewash is eco-friendly and non-toxic, making it a safe choice for both interior and exterior applications.
Difference Between Limewash and Paint
While both limewash and traditional paint can enhance a brick surface, they are fundamentally different in composition, durability, and overall effect. Limewashing brick maintains the rich texture of the brick, offering a cost-effective and low-maintenance solution, whereas painting brick with latex paint can obscure the brick’s natural character.
Key Differences:
- Durability: Limewash gets absorbed into the brick, making it less prone to peeling or chipping over time. Paint creates a thicker, surface-level coat that can trap moisture and lead to peeling over the years.
- Breathability: Limewash is breathable, meaning it allows moisture to escape from the brick, reducing the risk of damage. Paint, on the other hand, can seal in moisture, leading to long-term deterioration.
- Aesthetic: Limewash creates a matte, textured look with a natural patina, while paint delivers a more uniform and polished finish.
As Alex Smith, a renowned interior designer, explains, “Limewash is not just an aesthetic choice, it’s a step towards sustainable design, enhancing the longevity of brick surfaces.”
Pro Tip: Plan exterior limewashing projects for mild weather conditions to ensure even curing.
Limewash Appearance
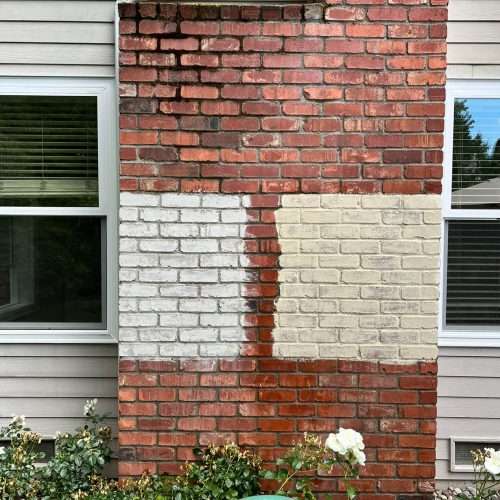
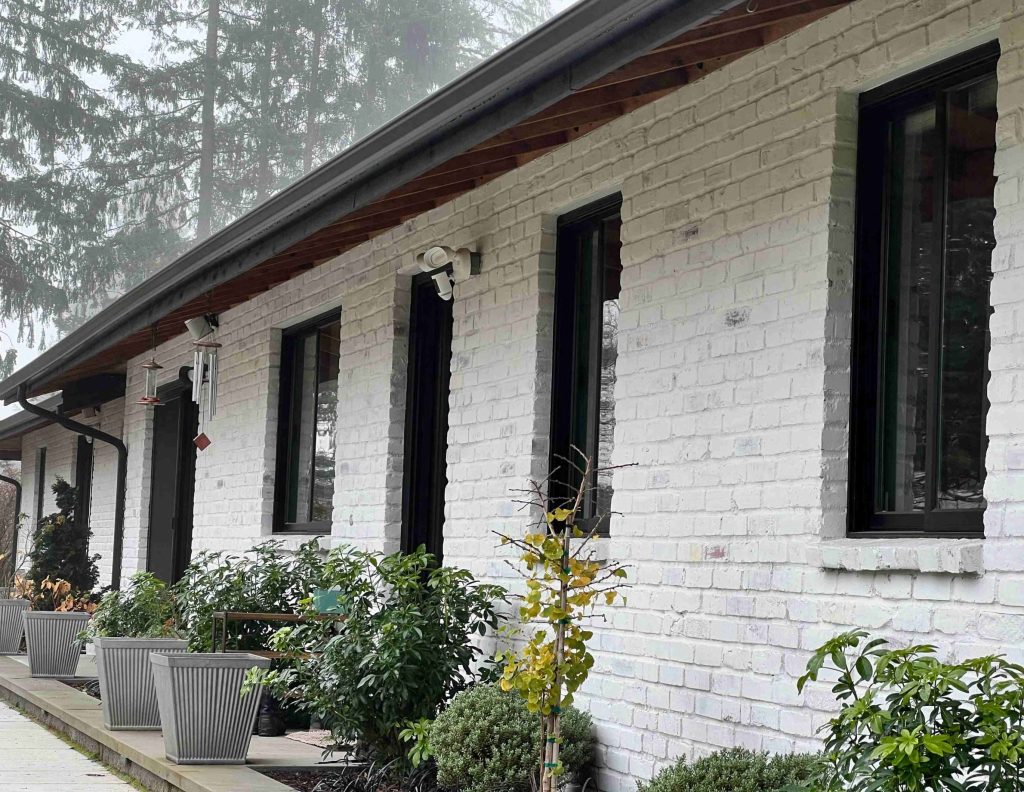
One of the standout features of limewashed brick is its soft and weathered appearance. Whether you use it for interior accent walls or a full home exterior, limewash allows some of the natural brick tones to peek through, creating depth and character. Applying one coat of limewash can provide a distressed look and allow underlying colors to show through. Over time, limewashed surfaces develop a one-of-a-kind patina as they age, giving your space a lived-in, authentic feel.
Buying Limewash Paint for a Painted Brick House
When purchasing limewash, you’ll find a variety of options on the market tailored to different needs. Some of the best limewash products for brick include brands like Romabio and Bauwerk. These modern limewash solutions often come pre-mixed, making them user-friendly for DIYers and professionals alike.
Limewash paint works best on a thoroughly cleaned brick surface. It is crucial to power wash the brick to remove any debris and ensure the porous surface is ready for the limewash paint to adhere properly.
Look for eco-friendly formulas for a more sustainable option, and choose colors that complement the tones of your brick and overall decor.
Limewash vs. Whitewash
Though limewash and whitewash are often used interchangeably, they aren’t the same thing. Whitewash is created by mixing water, salt, and hydrated lime or even diluted paint to achieve a brighter, more opaque finish.
Limewashed brick allows the brick’s texture to show through, preserving its natural appeal, while painted brick covers it up, which can trap moisture and lead to deterioration.
Comparison:
- Whitewash creates a cleaner, more solid overlay and is often associated with a modern aesthetic.
- Limewash offers a subtler, aged look, with greater durability and character over time.
For example, limewashing a house is ideal for achieving a weathered, old-world look, while whitewashing might suit contemporary or farmhouse-style interiors better.
Pros and Cons
Advantages
- Aesthetic Appeal: Provides a natural, soft finish with depth and texture.
- Durability: Long-lasting with minimal upkeep.
- Eco-Friendly: Made from natural, non-toxic materials.
- Breathable: Allows moisture to escape, protecting brick integrity.
Disadvantages
- Weather Dependency: Exterior applications should be done during specific conditions (not too hot or humid).
- Initial Application: Requires careful preparation and might be intimidating for first-time DIYers.
- Permanence (Optional): Though removable early on, limewash becomes increasingly permanent with time.
How to Make Limewash with Hydrated Lime
Making limewash is surprisingly simple! All you need is hydrated lime, water, and optional natural pigments for color. Simply mix one part lime with three parts water to achieve a paintable consistency. Allow it to slake (settle) for 24 hours for optimal results.
It is crucial to power wash every square inch of the brick to ensure optimal adhesion of the limewash.
Pro Tip: Wear gloves and protective eyewear, as lime can be caustic before it cures fully.
Preparing the Brick
Before applying limewash to your brick house, it’s essential to prepare the surface properly. Start by cleaning the brick with a mild detergent and water to remove any dirt, grime, or mildew. Use a garden hose to rinse the brick thoroughly, ensuring all cleaning agents are washed away. Allow the brick to dry completely before moving on to the next step.
If you’re using a DIY limewash recipe, mix the hydrated lime and water according to the recommended ratio, typically 80/20. This ensures the limewash has the right consistency for application. If you’re using a pre-mixed limewash paint, follow the manufacturer’s instructions for the best results. Proper preparation is crucial for achieving a smooth, even finish and ensuring the limewash adheres well to the brick surface.

Application Methods with a Masonry Brush
Limewash can be applied with a variety of tools depending on your desired effect. It is important to mix enough limewash for the whole house to ensure a consistent finish, especially when applying the product to larger surfaces. Common methods include:
- Brush Application for textured, hand-painted finishes.
- Spray Application for a smoother, even coat.
- Distressing Techniques, where limewash is partially wiped off during application to reveal more of the underlying brick.
Pro Tip: Always test limewash on a small section of your brick to see how it will appear after drying.
How to Limewash Brick
Step-by-Step Process
- Prepare the Surface: Clean the brick thoroughly to remove dust, dirt, and old finishes.
- Mix Your Limewash: Follow the recipe above or use a pre-mixed limewash paint.
- Apply a Base Coat: Use a brush or sprayer for even coverage. Allow it to dry for a few hours.
- Customize the Effect: Add a second coat or distress the first coat with a damp cloth for a more weathered look.
- Seal It (Optional): Apply a breathable sealant for additional protection.
Common Mistakes to Avoid
When applying limewash to your brick house, there are several common mistakes to avoid to ensure a successful project. One of the most frequent errors is not preparing the surface properly. Make sure to clean the brick thoroughly and let it dry completely before applying the limewash. This step is vital for the limewash to adhere correctly and provide a lasting finish.
Another mistake is applying too much limewash at once. It’s best to start with a small test patch to ensure you achieve the desired color and finish. Then, apply the limewash in sections, working from top to bottom to avoid streaks and uneven coverage. Avoid applying limewash in direct sunlight or during extreme weather conditions, as this can affect the finish and longevity of the limewash.
Finally, make sure to use a masonry brush to apply the limewash. This type of brush is designed to hold and distribute the limewash evenly, helping you achieve a smooth, consistent finish. By avoiding these common mistakes, you can ensure your limewash project enhances the beauty and durability of your brick house.

Removal
While limewash can often be pressure-washed off shortly after application, it becomes significantly harder to remove once it has fully cured. Consider testing a small area before fully committing.
FAQs
1. How long does limewash last?
When properly applied, limewash can last for decades with minimal maintenance.
2. Can I limewash other surfaces, like stone?
Yes! Limewash works well on stone and other porous surfaces, though some prep may vary.
3. Is limewash safe for indoor use?
Absolutely! Many modern limewash paints are VOC-free, making them safe for interiors.
4. How much does limewashing cost?
Costs depend on whether you DIY or hire professionals. On average, materials are fairly budget-friendly.
The Art of Timeless Design
Limewashed brick offers more than just a stunning aesthetic—it’s a sustainable and durable design solution that enhances your home’s character. Whether you’re restoring an old property or adding charm to a modern home, limewash is a top choice that effortlessly combines beauty and functionality.
If you’re in the Seattle Area and looking for professional application – Contact Us!